Changes on Dynamics 365 to Advanced Search and Managing Views
- 135354
- Mar 15, 2022
- 2 min read
Updated: Dec 5, 2023
The upcoming changes on Dynamics 365 / Power Apps update next April will significantly revamp and optimize advanced search. The same goes for managing views. The purpose of this article is to allow you to familiarize yourself with the various changes before they are applied in your production environments.
Perform an advanced search changes on Dynamics
The first major change to Advanced Search is the removal of the icon from the main navigation bar.

The icon that allowed access to advanced search has been removed. It must now be accessed through the main search bar or via an existing view.
1. Click in the search bar
2. Select Search for rows in a table using advanced filters

3. Select the table that contains the type of entities that will be the subject of the search

4. Define the filters to apply to the list of all entities in this table
5. Apply filters

It is normal that the advanced filters menu is familiar to you. Indeed, it can be accessed since the last Dynamics 365 update by selecting the funnel icon alongside the column options tool.
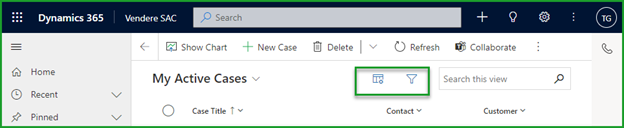
These two icons also change labels:
Icons | Old labels | New labels |
|---|---|---|
 | Column options | Edit columns |
 | Open advanced filter pane | Edit filters |
Selecting Edit filters from an existing view is also the easiest and most convenient way to access the advanced search considering that it is easier to start from an existing view than to determine all the filters to apply to a table to create the desired view.
1. Open the view selector

Search views
A search bar now allows you to type a few letters to speed up the search for a view from the selector.
2. Select Save as new view

Save changes on Dynamics to current view
It is now possible to save changes to a view or create a new view related to these changes from the view selector.
3. Name and describe the new view

New icon
Personal views are now accompanied by an icon to better differentiate them from system views.
It is no longer needed to use the old interface to share views.
1. Open the view selector
2. Select Manage and share views

Sort views
You can now sort views in different ways with just one click using the new sort by option.
3. Select the three dots to view the different actions related to your personal view

Actions | Description |
|---|---|
Hide | This view will no longer be displayed in your view selector but will remain active for other users/teams it is shared with. |
Set as default view | The selected view will be displayed each time you navigate to the page that contains the list of entities of that type. |
Edit info | This option allows you to rename and edit the description of this view. |
Assign | This action changes the view’s owner. |
Delete | This action permanently deletes this view for all users or teams it is shared with. |
Deactivate | It is possible to deactivate a view so that it no longer appears in searches but remains in the system. |
4. Select Share
5. Use the search field to choose the teams or CRM users with whom to share the view.

6. Assign permissions to users or teams with whom the view is shared
7. Select Share


Comments